Elevate Your Pest Control Business with Our Website and Internet Marketing Services

Archive for the ‘Services’ Category

Elevate Your Pest Control Business with Our Website and Internet Marketing Services

Sunday, November 12th, 2023
Pest control services

In the competitive landscape of pest control, having a strong online presence is no longer an option—it’s a necessity. At Bitwave Design, we understand the unique challenges local pest control companies face, and we’re here to empower your business with cutting-edge website and internet marketing solutions. Let’s explore how our services can take your pest control business to new heights.

Tailored Websites for Pest Control Success

Your website is the digital storefront of your pest control business. We specialize in creating professional, user-friendly websites that not only showcase your services but also connect with your target audience. Here’s what sets our website services apart:

1. Industry Expertise:

With over two decades of experience, we have a deep understanding of the pest control industry. Our websites are crafted to address the unique challenges and opportunities specific to your business.

2. Local SEO Optimization:

Dominate local search results with our targeted SEO strategies. We ensure your website ranks high for relevant keywords, making it easy for potential customers in your service area to find and choose your pest control services.

3. Mobile Responsiveness:

In a mobile-driven era, we prioritize mobile responsiveness. Your website will provide a seamless and enjoyable experience for users on smartphones and tablets, enhancing user engagement and satisfaction.

Strategic Internet Marketing Campaigns

A stunning website is just the beginning. Our internet marketing services are designed to drive traffic, increase leads, and boost your online visibility. Here’s how we make it happen:

1. Google My Business Optimization:

Appear prominently in local searches with an optimized Google My Business listing. We manage and enhance your online presence, ensuring your business stands out when potential customers are searching for pest control services in your area.

2. Targeted Online Advertising:

Reach your ideal customers with precision. Our online advertising campaigns, including pay-per-click (PPC) and social media promotions, are tailored to attract local customers actively seeking pest control solutions.

3. Transparent Pricing, No-Contract Options:

We believe in transparency and flexibility. Our pricing is straightforward, and we offer no-contract options, providing peace of mind for small businesses in the pest control industry.

Ready to Transform Your Pest Control Business?

Take the leap toward online success. Contact Bitwave Design today for a personalized consultation. Let us amplify your online presence, attract more customers, and position your pest control business as a local industry leader.

What are Nameservers and How Do I Update Them?

Monday, July 24th, 2023

Nameservers are the phonebook of the internet. They translate domain names, like example.com, into IP addresses, which are the numerical addresses of computers on the internet. When you type a domain name into your web browser, your browser sends a request to a nameserver to find out the IP address of the computer that hosts that domain.

Every domain name has at least two nameservers. These nameservers are usually provided by your domain registrar, but you can also use a third-party DNS provider.

For small businesses, it’s important to choose a reliable nameserver provider. If your nameservers are down or not working properly, your website and other online services may be unavailable. We use the popular and reliable Cloudflare DNS service for our websites.

How do I update the nameservers for my domain name?

To update the nameservers for a domain name that is registered with GoDaddy to use Cloudflare DNS, follow these steps:

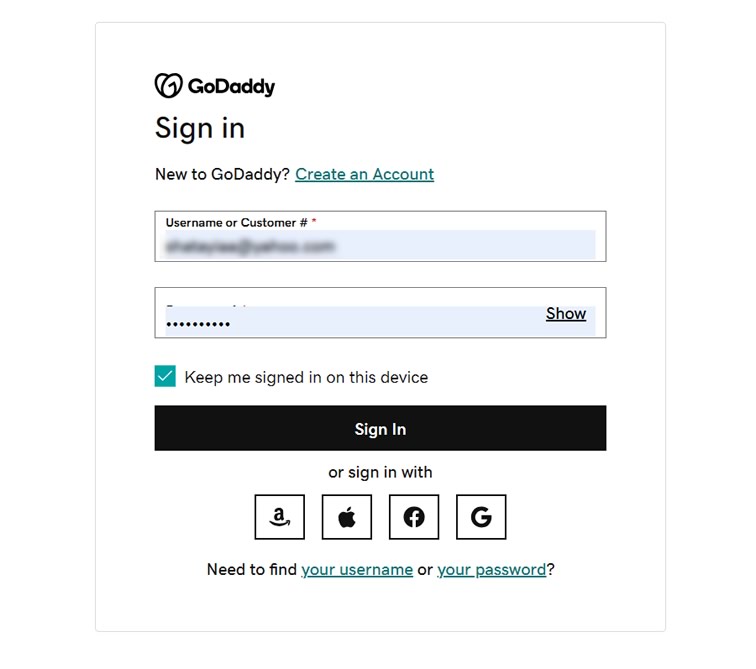
  1. Log in to your GoDaddy account

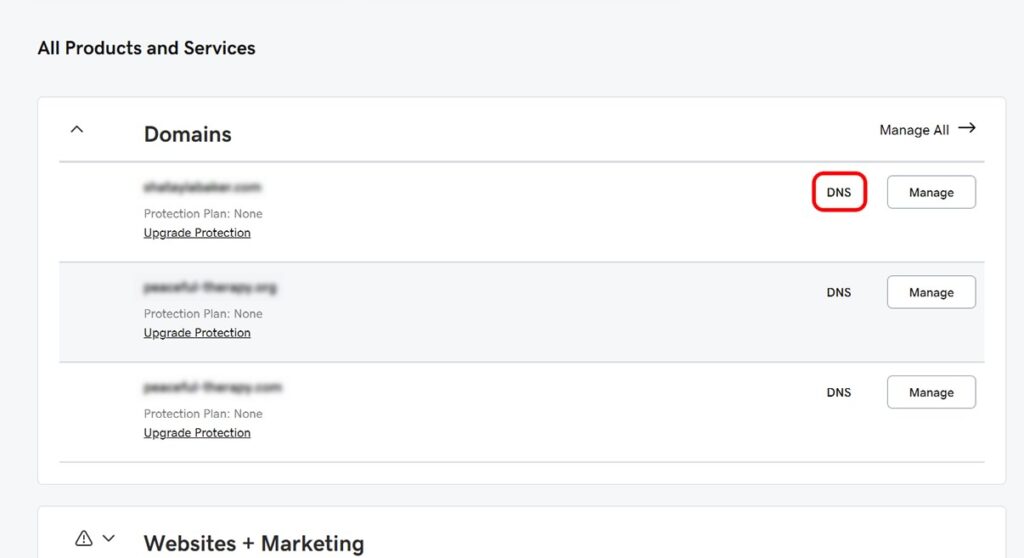
2. Scroll down to domains and click DNS next to the domain name you want to update.

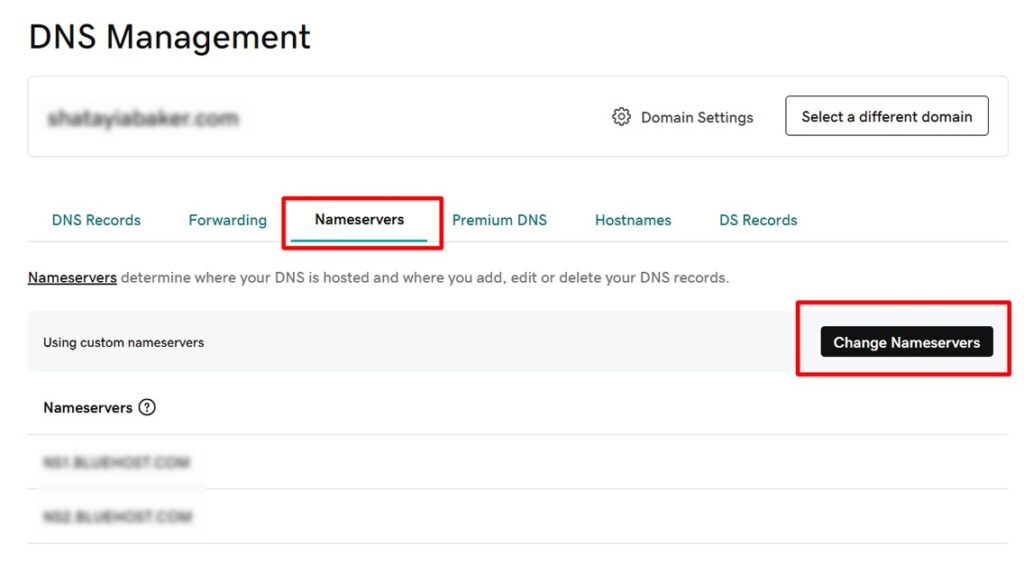
    3. Next click on the ‘Nameservers’ section and click the [Change Nameservers] button.

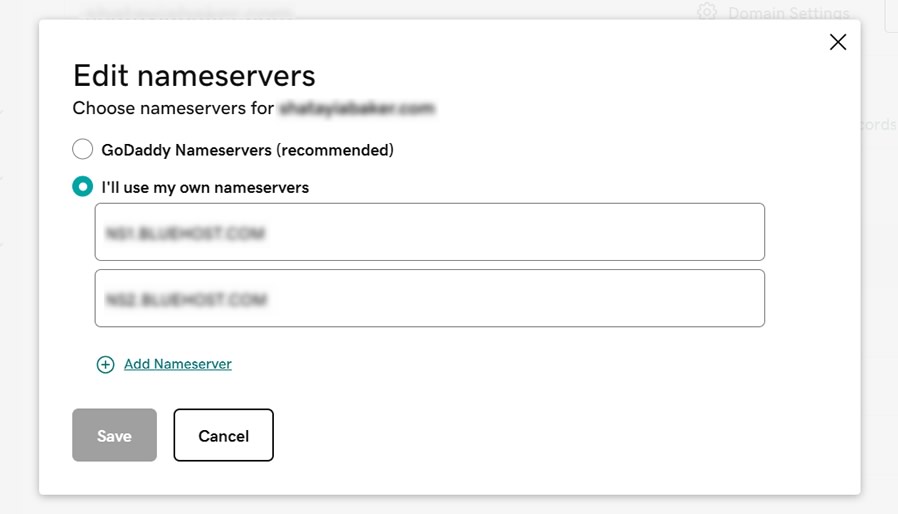
    4. Finally choose the option ‘I’ll use my own nameservers’ and enter the two server names provided by your web host. Click save and you’re done!

    If you have any questions or problems with this process or need instructions for another domain name registrar, feel free to drop us a line!

    Creating Gmail Message Filters

    Saturday, February 16th, 2019

    Get more control over your incoming messages 

    Use the following instructions to instruct Gmail how to handle important emails. Gmail can label messages from your domain email, and you can ensure that you never miss your Contact Form submissions again.

    1. Open Message Filter Settings

    In the search box at the top, click the button on the right side of the search box, shown below [Show search options].

    2. Create a Rule for Incoming Email From Your Domain

    Next, in the field [To] type the email address from your domain name (probably [email protected]). Now click [Create Filter].

    3. Apply Rules to Matching Messages

    On the next page you can tell Gmail what to do when it receives a message that matches this filter. You may choose to [Apply a label], which makes it easier to distinguish emails from your domain name email. The option [Never send it to Spam] ensures you won’t have to worry about these messages getting lost in your Spam folder.

    You may also choose to apply these rules to existing emails, by choosing the last option. 

    Create a Rule for Your Contact Form Emails

    To create a filter that only matches your Contact Form emails, go to step 2, then in the field [Subject] type the subject of your contact form emails. Now click [Create Filter].

    Set Up Your Domain Email in Gmail

    Wednesday, January 16th, 2019

    Use the following steps to get your new email account working in Gmail. We will provide you with the correct username and password.

    1. Log into your Gmail account.

    2. Click on the Settings icon in the upper right corner. A drop down menu should appear and you can click on [See all Settings].

    3. Click on the [Accounts and Import] tab. Then, in the section [Check mail from other accounts], click [Add a mail account]. A new window should pop up.

    4. Enter your full email address in the new window, then click the [Next] button.

    5. Ensure Import emails from my other account (POP3) is selected and click [Next].

    6. In the next window:

    • Enter the full email address as the username: [email protected]
    • Enter the password for the account
    • The POP Server is mail.domainname.com
    • Select Port 110.
    • Set the label option according to personal preference.

    7. Click the [Add Account] button. You should receive a confirmation message that the mail account has been added (for receiving email).

    8. Now, to be able to send mail out from Gmail using this address, make sure the “Yes” option is checked on the next screen. Then click the [Next] button:

    9. Enter your name here. Leave the “Treat as an alias” button checked. Click the [Next Step] button.

    10. On the next screen, enter the following information:

    • The SMTP Server will be: mail.domainname.com
    • Use Port 25
    • Enter the full username again: [email protected]
    • Enter the email password again
    • Leave the TLS option checked.
    • Click the [Add Account] button.

    11. A confirmation email will have been sent to your Gmail inbox.

    12. Check your Gmail inbox. You may need to wait for a minute or two.

    13. Open the Gmail confirmation email.

    14. Either click on the provided confirmation link or enter the confirmation code provided and click Verify. The small window will close automatically.

    Congratulations! The mail for your domain name email account will now appear in your normal Gmail inbox. Let us know if you have any problems getting this working.

    Ingredients For A Successful Website

    Sunday, January 2nd, 2011

    Creating and running an effective website involves expertise in several areas, including graphic design, coding, writing and marketing. Here’s how we put these ingredients together in our projects. (more…)

    How We Help Build Your Business Credit

    Monday, October 18th, 2010

    Establishing business credit is a priority for all businesses. We help each our clients by building an Internet presence for their business as well as helping build their business credit. (more…)


    Contact Us Today to Get Started!

    OUR HOURS: Mon - Fri 9am to 5pm

    (210) 745-2711

    Facebook Instagram LinkedIn Contact Us