In the dynamic landscape of small service-based businesses, creating and advertising special deals or offers can be a game-changer when it comes to attracting new customers and retaining existing ones. In this article, we’ll guide you through the strategic steps to design and execute an effective special deal, tailored to the unique needs of your small business.
Set Clear Objectives
Before diving into the details, define the goals of your special deal. Whether it’s boosting sales during a specific period, attracting new customers, or promoting a new service, having clear objectives will serve as the foundation for your entire strategy.
Understand Your Target Audience
Identifying your target audience is paramount. Understand their preferences and tailor your special deal to meet their needs. This personalized approach increases the chances of not only attracting customers but also building lasting relationships.
Determine the Offer Type
Select the type of offer that aligns with your business goals. Options include discounts, buy-one-get-one-free promotions, package deals, limited-time offers, or loyalty programs. Choose the one that resonates best with your target audience.
Set Clear Terms and Conditions:
Avoid confusion by clearly defining the terms and conditions of your offer. Specify the duration, eligibility criteria, restrictions, and any other relevant details. This transparency manages customer expectations and ensures a smooth implementation.
Sample Special Offer for a Service-Based Business:
Title: Winter Plumbing Check-Up and Savings
Offer Duration: November 15, 2023 – February 28, 2024
Description: Winter is here, and at Acme Plumbing, we want to ensure that your home stays cozy and worry-free throughout the cold months. Our exclusive “Winter Plumbing Check-Up and Savings” offer will keep your plumbing system in top shape and save you money!
Offer Details: (1) Comprehensive Plumbing Inspection: Our experienced plumbers will perform a thorough inspection of your plumbing system, checking for leaks, potential freezing points, and any other issues that could arise during the winter season. (2) Water Heater Check: We’ll ensure your water heater is operating efficiently, providing you with a steady supply of hot water when you need it most. (3) Pipe Insulation: To prevent freezing and bursting pipes, we’ll insulate vulnerable areas, protecting your plumbing and potentially saving you from costly repairs.
How to Claim the Offer: Contact Acme Plumbing at [phone number] or [email address]. Mention the “Winter Plumbing Check-Up and Savings” offer when scheduling your appointment. Our friendly team will coordinate a convenient time for your plumbing check-up.
Calculate Costs and Margins
Evaluate the financial implications of your offer. Calculate costs, consider potential discounts, and maintain healthy profit margins. This ensures that your special deal is not only attractive to customers but also profitable for your business.
Promote Effectively:
Develop a comprehensive marketing strategy to promote your special deal. Utilize various channels such as social media, email marketing, your website, and local advertising. Clearly communicate the value of the offer and create a sense of urgency to encourage customer action.
Use Eye-Catching Visuals
Design visually appealing graphics and promotional materials that captivate your audience. Ensure the visuals effectively communicate the value of your special deal while staying consistent with your brand.\
Monitor and Adjust
Regularly monitor the performance of your special deal. Collect customer feedback and analyze sales data. Be ready to make adjustments to your offer or marketing strategy based on the results, ensuring continuous improvement.
Create a Sense of Urgency
Encourage customers to take advantage of the special deal by incorporating elements of urgency. This could include limited-time offers or exclusive perks for early adopters, compelling customers to act promptly.
Build Relationships
View the special deal as an opportunity to build long-term relationships with customers. Collect contact information and encourage sign-ups for newsletters or loyalty programs to maintain communication beyond the promotional period.
By following these strategic steps, you can craft and implement a compelling special deal that not only attracts customers but also contributes to the overall success and growth of your small service-based business. Remember, the key lies in understanding your audience, setting clear goals, and delivering value that resonates with both new and existing customers.
Posted in Ideas, Marketing| Comments Off on Crafting a Compelling Special or Offer for Your Small Business
In the competitive landscape of pest control, having a strong online presence is no longer an option—it’s a necessity. At Bitwave Design, we understand the unique challenges local pest control companies face, and we’re here to empower your business with cutting-edge website and internet marketing solutions. Let’s explore how our services can take your pest control business to new heights.
Tailored Websites for Pest Control Success
Your website is the digital storefront of your pest control business. We specialize in creating professional, user-friendly websites that not only showcase your services but also connect with your target audience. Here’s what sets our website services apart:
1. Industry Expertise:
With over two decades of experience, we have a deep understanding of the pest control industry. Our websites are crafted to address the unique challenges and opportunities specific to your business.
2. Local SEO Optimization:
Dominate local search results with our targeted SEO strategies. We ensure your website ranks high for relevant keywords, making it easy for potential customers in your service area to find and choose your pest control services.
3. Mobile Responsiveness:
In a mobile-driven era, we prioritize mobile responsiveness. Your website will provide a seamless and enjoyable experience for users on smartphones and tablets, enhancing user engagement and satisfaction.
Strategic Internet Marketing Campaigns
A stunning website is just the beginning. Our internet marketing services are designed to drive traffic, increase leads, and boost your online visibility. Here’s how we make it happen:
1. Google My Business Optimization:
Appear prominently in local searches with an optimized Google My Business listing. We manage and enhance your online presence, ensuring your business stands out when potential customers are searching for pest control services in your area.
2. Targeted Online Advertising:
Reach your ideal customers with precision. Our online advertising campaigns, including pay-per-click (PPC) and social media promotions, are tailored to attract local customers actively seeking pest control solutions.
3. Transparent Pricing, No-Contract Options:
We believe in transparency and flexibility. Our pricing is straightforward, and we offer no-contract options, providing peace of mind for small businesses in the pest control industry.
Ready to Transform Your Pest Control Business?
Take the leap toward online success. Contact Bitwave Design today for a personalized consultation. Let us amplify your online presence, attract more customers, and position your pest control business as a local industry leader.
Posted in Marketing, Services| Comments Off on Elevate Your Pest Control Business with Our Website and Internet Marketing Services
Hey there, savvy entrepreneur! So, you’ve got a small service-based business, and you’re ready to conquer the online world. Great! Getting started with your marketing can seem like a daunting task though, since there are so many options available.
So we’ve created a simple, effective internet marketing plan to get you started. This is a simple checklist that your business can follow and refer back to often to help keep you headed in the right direction with your marketing efforts.
Step 1: Define Your Audience
Before you dive into the marketing jungle, figure out who you’re trying to reach. Who are your ideal customers? What are their needs and pain points? Knowing your audience is like having a treasure map to guide your marketing efforts.
Step 2: Build a User-Friendly Website
Think of your website as your digital storefront. Make it clean, easy to navigate, and most importantly, mobile-friendly. It should be easy to locate important info like where you’re located, prices / pricing options, contact info and common service questions and options.
Step 3: Master the Basics of SEO
SEO (Search Engine Optimization) is like the secret sauce of online visibility. Use relevant keywords related to your business in your website content. Google loves this, and it’ll help potential customers find you when they search for services like yours. Doing this well can also get your site to rank better than your competitors in search results.
Step 4: Claim Your Google My Business Listing
Picture this: someone Googles a service you offer, and boom, your business pops up on Google Maps. That’s the magic of Google My Business. Claim your listing, fill it out completely, and watch your local visibility soar. You should check your listing often for accuracy and add business updates periodically.
Step 5: Get Social
Don’t be shy – dive into the social media pool! Pick platforms where your audience hangs out. Facebook, Instagram, Twitter – choose wisely. Share valuable content, engage with your audience, and don’t forget to sprinkle in a bit of your business personality.
Step 6: Content is King
Start a blog on your website. Write about things your audience cares about. This not only showcases your expertise but also boosts your SEO. Videos are great too – they don’t need to be Spielberg-level productions; even smartphone clips can work wonders.
Step 7: Email Marketing
Collect those email addresses (with permission, of course) and start an email list. Send out regular updates, promotions, or helpful tips. Email marketing is a direct line to your audience and can turn one-time customers into loyal fans.
Step 8: Ask for Reviews
Encourage happy customers to leave reviews on your website, Google, or other relevant platforms. Positive reviews build trust, and potential customers love hearing about other people’s positive experiences.
Step 9: Paid Advertising
When you’re ready, dip your toes into paid advertising. Platforms like Google Ads or Facebook Ads can help you target your audience precisely. Start small, analyze the results, and adjust your strategy accordingly.
Step 10: Analyze and Adapt
Use tools like Google Analytics to track your website’s performance. See what’s working and what needs tweaking. The digital world moves fast, so be ready to adapt your strategy based on what resonates with your audience.
There you have it – a straightforward internet marketing plan to kickstart your small service-based business into the online spotlight. Remember, consistency is key. Now go out there and conquer the digital landscape! 🚀
Posted in Ideas, Marketing, SEO| Comments Off on Digital Marketing 101 for Your Small Business
Nameservers are the phonebook of the internet. They translate domain names, like example.com, into IP addresses, which are the numerical addresses of computers on the internet. When you type a domain name into your web browser, your browser sends a request to a nameserver to find out the IP address of the computer that hosts that domain.
Every domain name has at least two nameservers. These nameservers are usually provided by your domain registrar, but you can also use a third-party DNS provider.
For small businesses, it’s important to choose a reliable nameserver provider. If your nameservers are down or not working properly, your website and other online services may be unavailable. We use the popular and reliable Cloudflare DNS service for our websites.
How do I update the nameservers for my domain name?
To update the nameservers for a domain name that is registered with GoDaddy to use Cloudflare DNS, follow these steps:
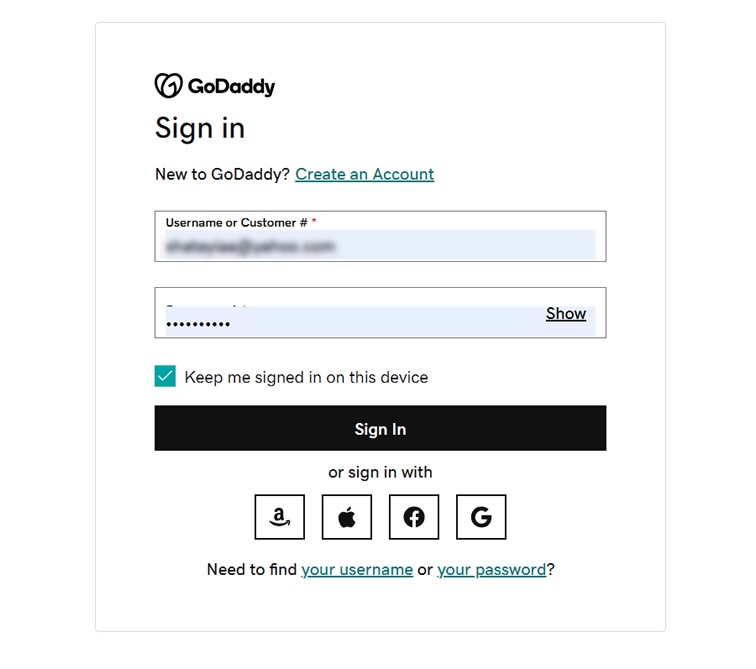
Log in to your GoDaddy account
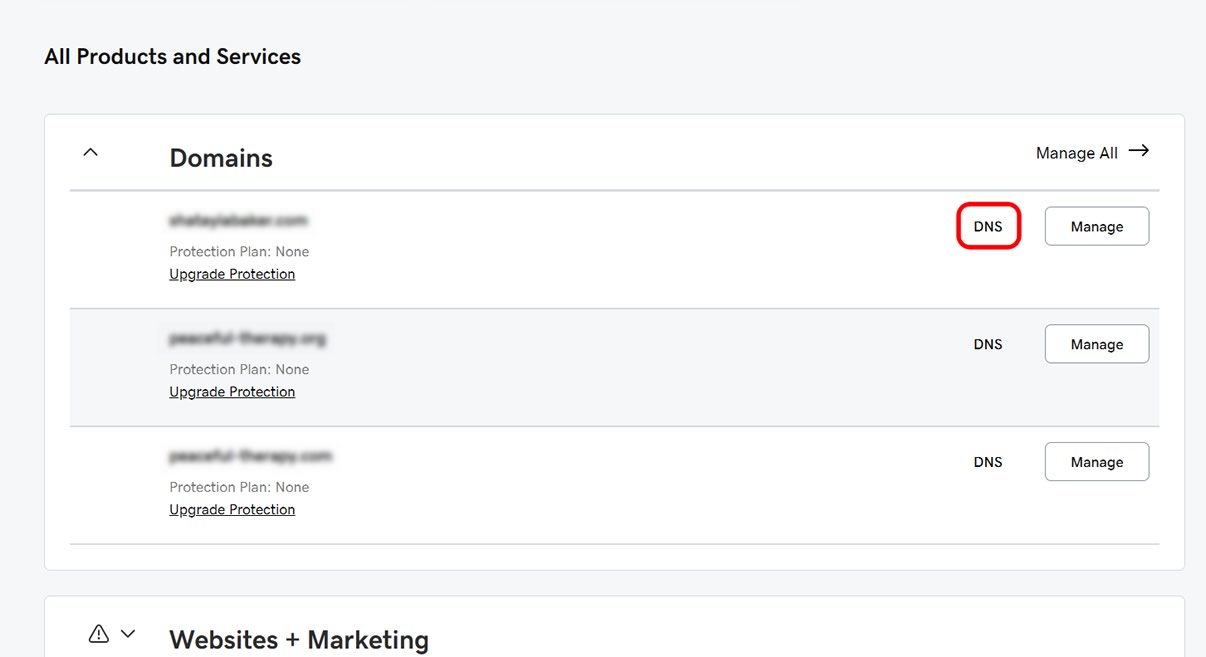
2. Scroll down to domains and click DNS next to the domain name you want to update.
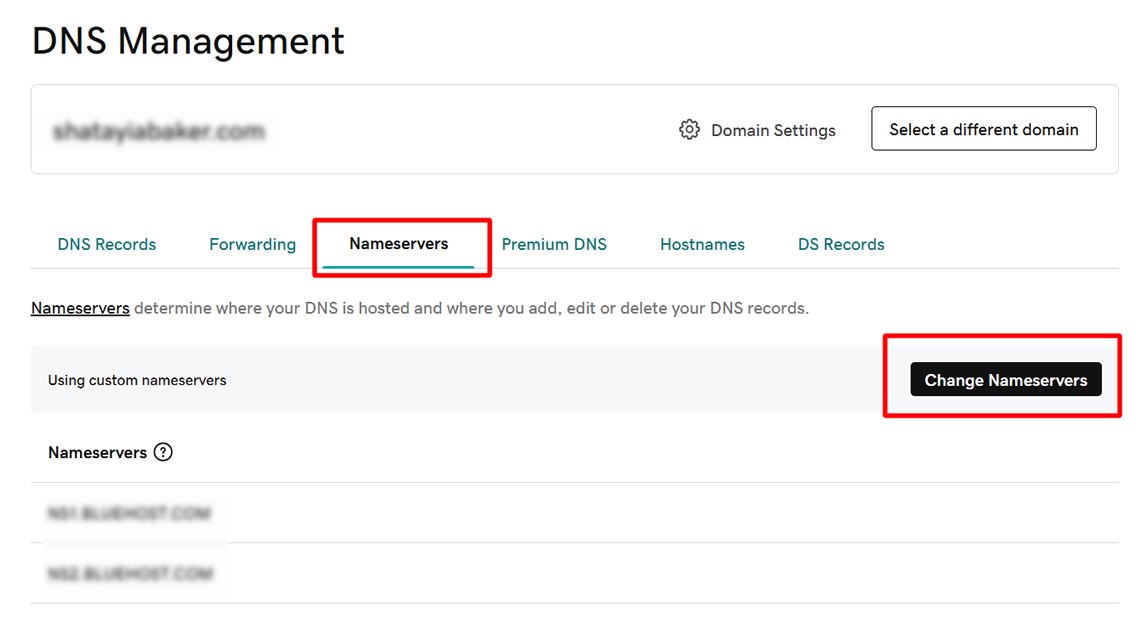
3. Next click on the ‘Nameservers’ section and click the [Change Nameservers] button.
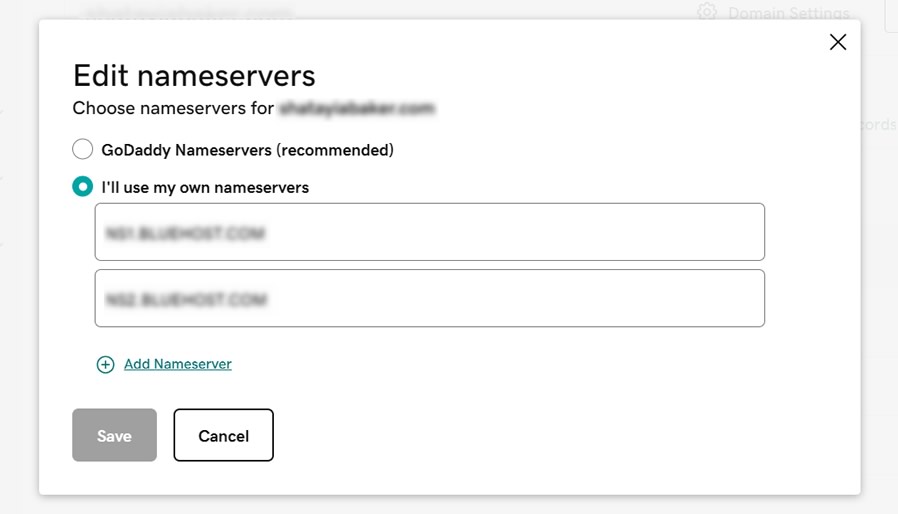
4. Finally choose the option ‘I’ll use my own nameservers’ and enter the two server names provided by your web host. Click save and you’re done!
If you have any questions or problems with this process or need instructions for another domain name registrar, feel free to drop us a line!
Posted in Services| Comments Off on What are Nameservers and How Do I Update Them?
Having helpful information and advice on your website is generally appreciated by potential customers, but did you know that this is also one of the best way to increase your visibility online?
Google uses a variety of factors to determine the ranking of websites in its search results, including the quality and relevance of the content on the site. One key factor is the presence of original, helpful content that provides value to users and sets the site apart from its competitors.
As a musician you already likely have a personal page where you interact with friends and fans, and share music releases, shows and other news. Should you also create and maintain a separate Facebook page for your music / band?
Yes, it is a good idea for a musician to have both a personal Facebook account and a page for their music. Here is how they could ideally be used to promote your music:
Personal Facebook account: This is where you can connect with friends and family, share personal updates, and post about your music. It’s a great way to stay in touch with people who are already supportive of your music, and it can also be a way to reach new people who are interested in what you’re doing.
Music Facebook page: This is where you can connect with fans of your music, share news about your releases, and promote upcoming shows. It’s a great way to build a community of people who are passionate about your music, and it can also be a way to generate buzz for your career.
Having both a personal Facebook account and a page for your music can help you reach a wider audience and build a stronger fan base. It’s also a good way to keep your personal and professional life separate, which can be helpful when you’re trying to focus on your music career.
Here are some additional tips for using a Facebook page to promote your music:
Post regularly: The more you post, the more likely people are to see your content. Try to post as often as possible, and make sure your posts are interesting and engaging.
Use high-quality images and videos: People are more likely to stop and look at a post that has a great image or video. Make sure your visuals are high-quality and relevant to your music.
Use relevant hashtags: Hashtags are a great way to get your content seen by more people. When you use relevant hashtags, your posts will show up in search results for those hashtags.
Run Facebook ads: If you want to reach a wider audience, you can run Facebook ads. Facebook ads can be a great way to promote your music to people who are interested in what you’re doing.
By following these tips, you can use Facebook to promote your music and reach a wider audience.
Posted in Marketing| Comments Off on Should Musicians Maintain Both a Personal Facebook Account and Music Page?
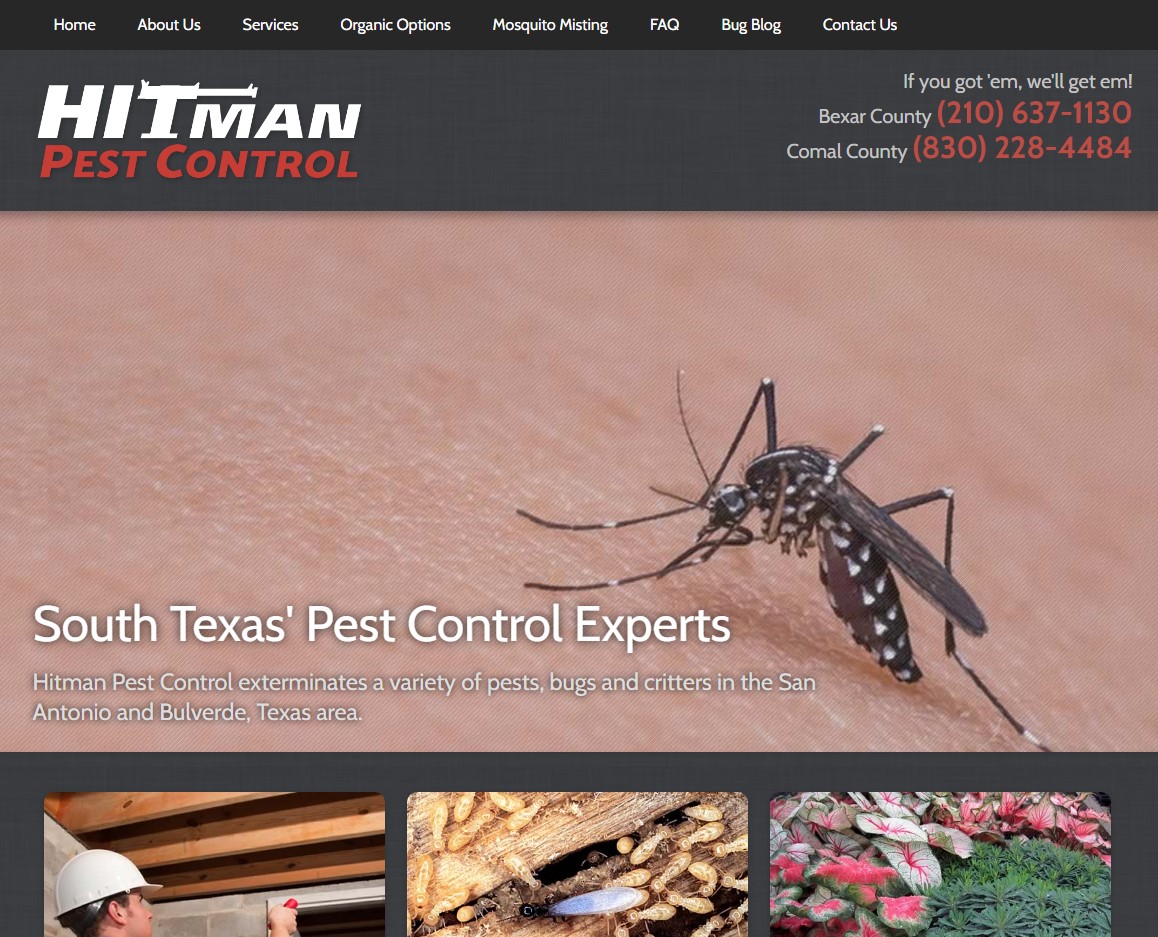
We’ve been handling website and marketing services for Hitman Pest Control since 2007. They offer pest control services in San Antonio, Bulverde and Spring Branch, TX, offering exterminations, treatments for termites, ants, roaches, mosquito misting and more.
In addition to designing the original website and hosting it for more than 15 years, we’ve kept it up-to date with several redesigns to keep it looking up-to-date, as well as keeping it current with web technologies like SSL, mobile compatibility, social media integration, speed and caching enhancements and more.
We also provide SEO (search engine optimization) and marketing services to ensure that their services are easy to locate on major search sites, as well as social media.
Posted in Projects| Comments Off on Featured Project: Hitman Pest Control
If you’ve setup / claimed your business profile on service like Google Business, Yelp, Nextdoor and other similar sites, you’re on the right track to getting more business, especially for local service businesses.
These sites allow customers to leave reviews, which can make or break your business. How? Reviews are one of the key factors that potentials customers use to decide whether they will do business with you or one of your competitors. Too many bad reviews will cause potential client to look elsewhere.
The good news is that you aren’t powerless in this situation. In addition to generally providing high-quality, prompt service with good communication, each of these services allow you to respond to reviews, both positive and negative ones. Here are some tips on how to respond to online reviews:
Respond promptly. Customers appreciate a prompt response, even if it’s just to say that you’re looking into the matter.
Be positive and professional. Even if the review is negative, try to stay positive and professional in your response.
Acknowledge the reviewer’s concerns. Even if you don’t agree with the reviewer, take the time to understand their concerns.
Apologize if necessary. If you made a mistake, apologize sincerely.
Offer to make things right. If you can, offer to make things right for the customer. This could involve offering a refund, a discount, or a free product or service.
Thank the reviewer for their feedback. Even if the review is negative, thank the reviewer for taking the time to leave feedback.
By following these tips, you can show your customers that you value their feedback and that you’re committed to providing a great experience.
Here are some additional tips for responding to negative reviews:
Don’t take it personally. It’s important to remember that negative reviews are often about the customer’s experience, not about you personally.
Don’t get defensive. It’s tempting to defend yourself when you receive a negative review, but this is usually counterproductive. Instead, focus on understanding the customer’s concerns and addressing them in a positive and professional way.
Offer a solution. If the customer is unhappy with their experience, offer a solution that will make them happy. This could involve a refund, a discount, or a free product or service.
Follow up. After you’ve responded to the negative review, follow up with the customer to make sure that they’re satisfied with the resolution. This shows that you’re committed to providing a great customer experience.
Also don’t forget that almost all of these services allow you to share a link with your customers that allows them to leave you a review. Share these links with your best customers!
By following these tips, you can turn negative reviews into an opportunity to improve your business and build stronger relationships with your customers.
Posted in Local Search, Marketing| Comments Off on Don’t Ignore Your Online Reviews!
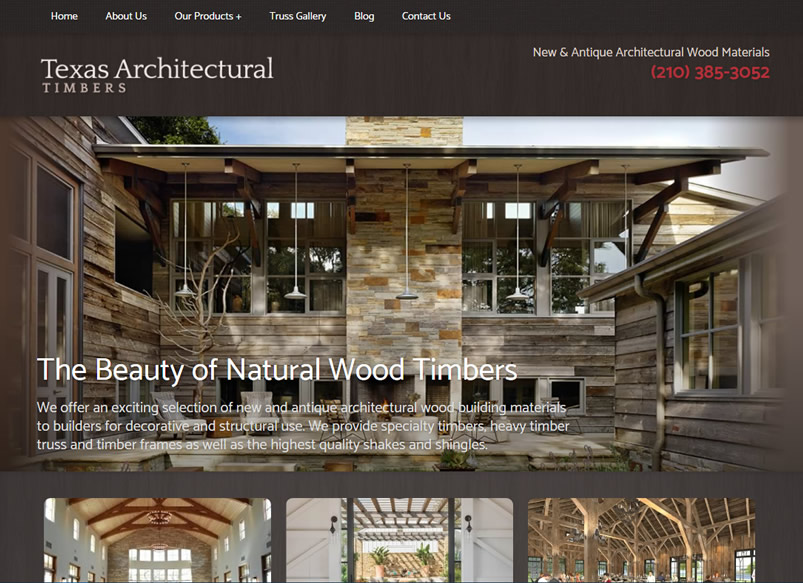
Texas Architectural Timbers has been our customer since 2008. Over the years we’ve done many redesigns to keep it looking current and modern, to take advantage of new technologies, and to ensure that it’s mobile friendly.
They are based in the Texas hill country, and they offer a variety of unique wood building materials to builders across the country, including antique, weathered and textured timbers.
Posted in Projects| Comments Off on Featured Project: Texas Architectural Timbers
MRT professionally restores, repairs and cleans leather furniture, chairs, sofas, as well as automotive interiors, watercraft and more. They can also handle repairs to wood, parts, springs, stuffing and more.
Posted in Projects| Comments Off on New Project: MRT Furniture Restoration